Mastering posture correction for is essential for achieving peak physical transformation. Take a look at your side-profile reflection in a full-length bedroom mirror while standing relaxed in normal posture. If your lower stomach protrudes forward like a pronounced potbelly even though you are relatively lean, while your buttocks stick far outward behind you and your lower lumbar back curves inward into an exaggerated, hollow C-shape arch, you are suffering from a chronic orthopedic postural deformity known as Hyper-Lumbar Lordosis driven by Anterior Pelvic Tilt (APT). In healthy spinal architecture, the pelvis sits level and neutral like a bowl of water balanced perfectly straight. When your pelvis tips forward (Anterior Tilt), the water spills out the front of the bowl, forcing your lower lumbar vertebrae to compress together in a tight, hyper-extended arch. This hyper-lordotic curvature slams your posterior facet joints together, pinches intervertebral discs, and causes severe, chronic lower back fatigue during prolonged standing or walking. To permanently fix hyper-lumbar lordosis right in your bedroom without surgery or braces, you must execute a clinical Lower-Cross Syndrome Correction routine that stretches chronically tight anterior hip muscles while awakening dormant posterior stabilizers.
Mastering lumbar lordosis correction requires an uncompromising commitment to understanding human spinal biomechanics, optimal stabilization protocols, and evidence-based nutritional strategies. Many home fitness enthusiasts fall victim to commercial shortcuts or misleading advice, yet the actual biological pathways governing spinal health and erector spinae development follow precise scientific rules that, when understood and applied correctly, produce extraordinary and lasting results.
Throughout this comprehensive guide on lumbar lordosis correction, we will dismantle prevalent fitness myths and provide you with an actionable, step-by-step framework tailored specifically for the Indian lifestyle. Whether your goal is to build massive lumbar strength, fix postural imbalances, overcome chronic lower back pain, or prevent spinal disc herniations, every single instruction detailed below is backed by clinical research and proven orthopedic rehabilitation protocols used by elite physical therapists.
Before initiating any intensive protocol for lumbar lordosis correction, it is essential to establish baseline spinal stability metrics and eliminate daily ergonomic habits that actively compress your intervertebral discs. By combining strict anti-inflammatory nutritional saturation, consistent core-activation routines, and optimized decompression recovery practices, you empower your lower back to express its maximum genetic strength and endurance without risk of injury or chronic pain.
Posture Correction For: Anatomy of Lower-Cross Syndrome: The Diagonal Muscular Tug-of-War
To correct anterior pelvic tilt and hyper-lumbar lordosis right at home, you must understand the muscular diagnosis formulated by legendary orthopedic researcher Dr. Vladimir Janda: ‘Lower-Cross Syndrome’. Imagine drawing an X-shaped cross across your side profile centered directly on your hip joints. The diagonal line running from your front hips up to your lower back represents your Chronically Tight & Overactive Muscles: specifically, your Iliopsoas (hip flexors) and your lower lumbar Erector Spinae column.
The opposite diagonal line running from your front abdomen down to your buttocks represents your Chronically Weak & Dormant Muscles: specifically, your Rectus Abdominis (front core) and your Gluteus Maximus (buttocks). When you sit hunched across a desk chair for 10 hours daily, your psoas hip flexors shorten into rigid cables while your glutes and abs go to sleep. When you stand up, those tight psoas cables pull the front of your pelvic bone down, while your tight lower back muscles pull the back of your pelvis up — tipping your pelvis forward into severe Anterior Tilt. To level your pelvis, you must simultaneously stretch the tight diagonal (Psoas + Lower Back) while strengthening the weak diagonal (Abs + Glutes).

The Dr. Janda Lower-Cross Diagonal Map
To fully execute The Dr. Janda Lower-Cross Diagonal Map effectively, you must maintain uncompromised technical discipline and understand the underlying orthopedic mechanism. Why tight psoas and tight lower back muscles form an overactive X-cross that tips your pelvic bone forward. When executed consistently over a 60-to-90-day training cycle, this specific protocol forces profound spinal adaptation, strengthening the deep multifidus and erector spinae fibers, improving intervertebral disc hydration, and enhancing neuromuscular core co-activation across the lumbar spine.
Furthermore, integrating The Dr. Janda Lower-Cross Diagonal Map into your daily routine provides a direct protective shield against modern office-chair posture and chronic lower back fatigue. By focusing on progressive isometric endurance, strict spinal neutrality, and controlled hinging mechanics during lumbar lordosis correction, you eliminate common spinal bottlenecks and accelerate your body natural healing capacity. Ensure that every repetition or static hold is performed with abdominal bracing and full muscular control to capture 100% of the biomechanical benefits.
Reciprocal Inhibition of Dormant Abs & Glutes
To fully execute Reciprocal Inhibition of Dormant Abs & Glutes effectively, you must maintain uncompromised technical discipline and understand the underlying orthopedic mechanism. How tight hip flexors send neurological inhibitory signals to your glutes and abs, shutting them down completely. When executed consistently over a 60-to-90-day training cycle, this specific protocol forces profound spinal adaptation, strengthening the deep multifidus and erector spinae fibers, improving intervertebral disc hydration, and enhancing neuromuscular core co-activation across the lumbar spine.
Furthermore, integrating Reciprocal Inhibition of Dormant Abs & Glutes into your daily routine provides a direct protective shield against modern office-chair posture and chronic lower back fatigue. By focusing on progressive isometric endurance, strict spinal neutrality, and controlled hinging mechanics during lumbar lordosis correction, you eliminate common spinal bottlenecks and accelerate your body natural healing capacity. Ensure that every repetition or static hold is performed with abdominal bracing and full muscular control to capture 100% of the biomechanical benefits.
Facet Joint Jamming & Disc Shearing Physics
To fully execute Facet Joint Jamming & Disc Shearing Physics effectively, you must maintain uncompromised technical discipline and understand the underlying orthopedic mechanism. Why hyper-lumbar lordosis slams the bony posterior arches of your vertebrae together, causing stabbing lower back pain during standing. When executed consistently over a 60-to-90-day training cycle, this specific protocol forces profound spinal adaptation, strengthening the deep multifidus and erector spinae fibers, improving intervertebral disc hydration, and enhancing neuromuscular core co-activation across the lumbar spine.
Furthermore, integrating Facet Joint Jamming & Disc Shearing Physics into your daily routine provides a direct protective shield against modern office-chair posture and chronic lower back fatigue. By focusing on progressive isometric endurance, strict spinal neutrality, and controlled hinging mechanics during lumbar lordosis correction, you eliminate common spinal bottlenecks and accelerate your body natural healing capacity. Ensure that every repetition or static hold is performed with abdominal bracing and full muscular control to capture 100% of the biomechanical benefits.
Phase 1: Unlocking the Iliopsoas — The Couch Psoas Stretch & 90/90 Lunge
You can do thousands of abdominal crunches and glute bridges, but if your Iliopsoas (the deep hip flexor muscle connecting your lumbar vertebrae directly to your femur bone) remains tight and shortened, your pelvis will physically remain locked in anterior tilt. Phase 1 of our home correction system initiates with two aggressive, deep hip-flexor release stretches: The Couch Psoas Stretch and The Posterior-Tilt 90/90 Kneeling Lunge.
For the Couch Psoas Stretch (The King of Hip Openers): kneel across your yoga mat with your back to your couch or a bare wall. Slide your right knee all the way backward until your right shin and top of your foot rest flat vertically upward against the front of the couch cushion or plaster wall. Step your left foot forward into a lunge stance. Crucially, before lifting your chest, squeeze your right buttock tightly to posteriorly tilt your pelvis. Slowly raise your torso upright until you feel an intense, releasing stretch running deep inside your right front hip crease and lower abdomen. Hold static for 90 continuous seconds per side. For the Posterior-Tilt 90/90 Kneeling Lunge: kneel on one knee with both knees bent at exactly 90 degrees. Squeeze your rear glute and pull your front hip bone upward toward your ribs (posterior tilt) while leaning forward 2 inches — hold for 60 seconds per leg to elongate the psoas.

The 90-Second Couch Psoas Elongation Window
To fully execute The 90-Second Couch Psoas Elongation Window effectively, you must maintain uncompromised technical discipline and understand the underlying orthopedic mechanism. Holding your shin vertically against a couch cushion for 90 seconds to physically lengthen tight, shortened iliopsoas collagen bundles. When executed consistently over a 60-to-90-day training cycle, this specific protocol forces profound spinal adaptation, strengthening the deep multifidus and erector spinae fibers, improving intervertebral disc hydration, and enhancing neuromuscular core co-activation across the lumbar spine.
Furthermore, integrating The 90-Second Couch Psoas Elongation Window into your daily routine provides a direct protective shield against modern office-chair posture and chronic lower back fatigue. By focusing on progressive isometric endurance, strict spinal neutrality, and controlled hinging mechanics during lumbar lordosis correction, you eliminate common spinal bottlenecks and accelerate your body natural healing capacity. Ensure that every repetition or static hold is performed with abdominal bracing and full muscular control to capture 100% of the biomechanical benefits.
The Mandatory Glute-Squeeze Posterior Tilt Cue
To fully execute The Mandatory Glute-Squeeze Posterior Tilt Cue effectively, you must maintain uncompromised technical discipline and understand the underlying orthopedic mechanism. Why you must squeeze your buttocks tightly while lunging to tip your pelvis backward and isolate true hip flexor release. When executed consistently over a 60-to-90-day training cycle, this specific protocol forces profound spinal adaptation, strengthening the deep multifidus and erector spinae fibers, improving intervertebral disc hydration, and enhancing neuromuscular core co-activation across the lumbar spine.
Furthermore, integrating The Mandatory Glute-Squeeze Posterior Tilt Cue into your daily routine provides a direct protective shield against modern office-chair posture and chronic lower back fatigue. By focusing on progressive isometric endurance, strict spinal neutrality, and controlled hinging mechanics during lumbar lordosis correction, you eliminate common spinal bottlenecks and accelerate your body natural healing capacity. Ensure that every repetition or static hold is performed with abdominal bracing and full muscular control to capture 100% of the biomechanical benefits.
Releasing Rectus Femoris Quad Tightness
To fully execute Releasing Rectus Femoris Quad Tightness effectively, you must maintain uncompromised technical discipline and understand the underlying orthopedic mechanism. Understanding how stretching your quadriceps simultaneously with your psoas removes the double-downward pull on your pelvic bone. When executed consistently over a 60-to-90-day training cycle, this specific protocol forces profound spinal adaptation, strengthening the deep multifidus and erector spinae fibers, improving intervertebral disc hydration, and enhancing neuromuscular core co-activation across the lumbar spine.
Furthermore, integrating Releasing Rectus Femoris Quad Tightness into your daily routine provides a direct protective shield against modern office-chair posture and chronic lower back fatigue. By focusing on progressive isometric endurance, strict spinal neutrality, and controlled hinging mechanics during lumbar lordosis correction, you eliminate common spinal bottlenecks and accelerate your body natural healing capacity. Ensure that every repetition or static hold is performed with abdominal bracing and full muscular control to capture 100% of the biomechanical benefits.
Phase 2: Awakening the Posterior Diagonal — Posterior Pelvic Tilt Glute Bridges
Once your tight anterior hip flexors are stretched and unlocked, your pelvis is physically free to rotate backward into neutral alignment. Phase 2 immediately capitalizes on this new joint mobility by executing Posterior Pelvic Tilt (PPT) Glute Bridges to re-train your dormant buttocks muscles to anchor the back of your pelvis down.
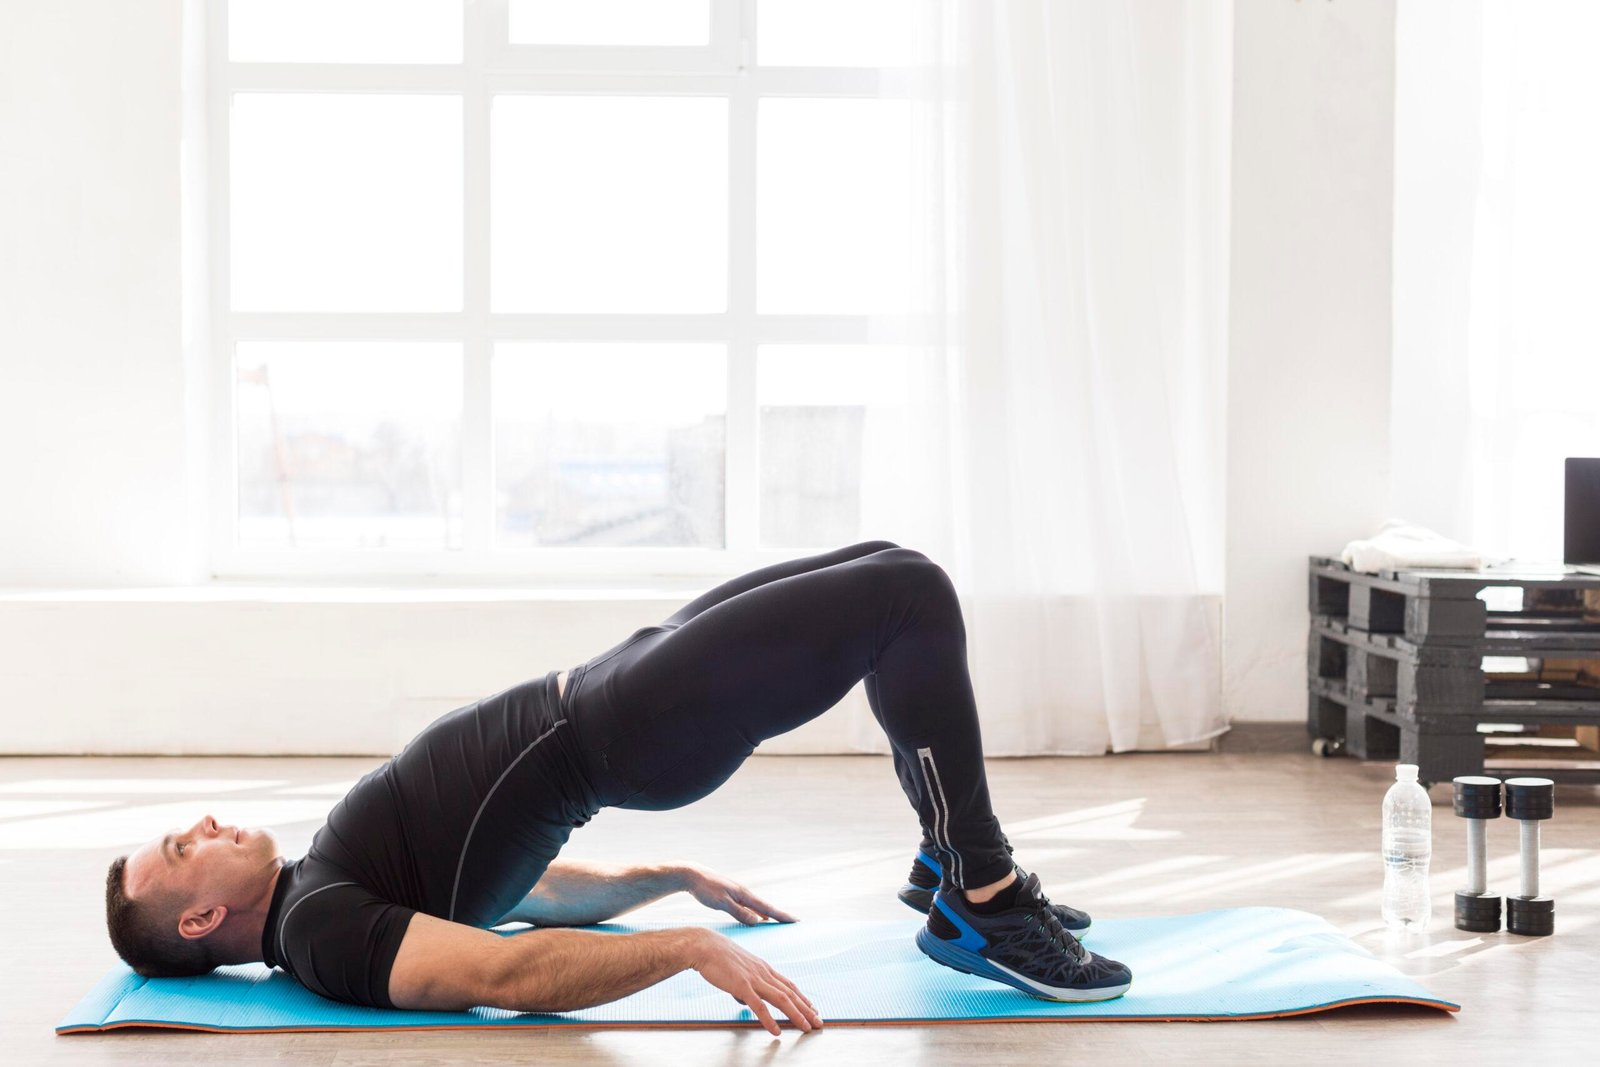
Lie flat on your back across your yoga mat with knees bent at 90 degrees and feet flat on the carpet shoulder-width apart. Notice the hollow air gap under your lower lumbar spine where your back curves off the carpet. Step 1: Execute a Posterior Pelvic Tilt by squeezing your abdominal muscles and pulling your hip bones upward toward your ribcage until your lower lumbar spine flattens completely into the carpet (zero air gap). Step 2: Maintaining this strict flattened lumbar position, drive through your heels and squeeze your buttocks together to lift your hips off the carpet into a glute bridge. Because your pelvis is pre-locked in posterior tilt, your lower back erectors cannot take over the lift — 100 percent of the mechanical extension is forced straight into your gluteus maximus. Hold the top squeeze for 3 strict seconds; perform 4 sets of 15 reps.

Zero-Air-Gap Lumbar Carpet Flattening
To fully execute Zero-Air-Gap Lumbar Carpet Flattening effectively, you must maintain uncompromised technical discipline and understand the underlying orthopedic mechanism. Pulling your hip bones upward toward your ribs to smash your lower back completely flat against the carpet before lifting your hips. When executed consistently over a 60-to-90-day training cycle, this specific protocol forces profound spinal adaptation, strengthening the deep multifidus and erector spinae fibers, improving intervertebral disc hydration, and enhancing neuromuscular core co-activation across the lumbar spine.
Furthermore, integrating Zero-Air-Gap Lumbar Carpet Flattening into your daily routine provides a direct protective shield against modern office-chair posture and chronic lower back fatigue. By focusing on progressive isometric endurance, strict spinal neutrality, and controlled hinging mechanics during lumbar lordosis correction, you eliminate common spinal bottlenecks and accelerate your body natural healing capacity. Ensure that every repetition or static hold is performed with abdominal bracing and full muscular control to capture 100% of the biomechanical benefits.
Isolating Pure Gluteus Maximus Hip Extension
To fully execute Isolating Pure Gluteus Maximus Hip Extension effectively, you must maintain uncompromised technical discipline and understand the underlying orthopedic mechanism. Why pre-locking posterior tilt prevents your lower back from arching and forces your buttocks to do 100 percent of the lifting work. When executed consistently over a 60-to-90-day training cycle, this specific protocol forces profound spinal adaptation, strengthening the deep multifidus and erector spinae fibers, improving intervertebral disc hydration, and enhancing neuromuscular core co-activation across the lumbar spine.
Furthermore, integrating Isolating Pure Gluteus Maximus Hip Extension into your daily routine provides a direct protective shield against modern office-chair posture and chronic lower back fatigue. By focusing on progressive isometric endurance, strict spinal neutrality, and controlled hinging mechanics during lumbar lordosis correction, you eliminate common spinal bottlenecks and accelerate your body natural healing capacity. Ensure that every repetition or static hold is performed with abdominal bracing and full muscular control to capture 100% of the biomechanical benefits.
The 3-Second Top PPT Squeeze & Re-Training
To fully execute The 3-Second Top PPT Squeeze & Re-Training effectively, you must maintain uncompromised technical discipline and understand the underlying orthopedic mechanism. Holding every bridge lockout motionless for 3 seconds to re-wire your brain to keep your pelvis level during standing posture. When executed consistently over a 60-to-90-day training cycle, this specific protocol forces profound spinal adaptation, strengthening the deep multifidus and erector spinae fibers, improving intervertebral disc hydration, and enhancing neuromuscular core co-activation across the lumbar spine.
Furthermore, integrating The 3-Second Top PPT Squeeze & Re-Training into your daily routine provides a direct protective shield against modern office-chair posture and chronic lower back fatigue. By focusing on progressive isometric endurance, strict spinal neutrality, and controlled hinging mechanics during lumbar lordosis correction, you eliminate common spinal bottlenecks and accelerate your body natural healing capacity. Ensure that every repetition or static hold is performed with abdominal bracing and full muscular control to capture 100% of the biomechanical benefits.
Phase 3: Strengthening the Anterior Diagonal — The RKC Plank & Dead Bug
To lock your newly leveled pelvis into permanent neutral alignment so it never tips forward again throughout your workday, you must build impenetrable anterior core stiffness across your Rectus Abdominis and Transverse Abdominis using two clinical anti-tilt exercises: The RKC Plank and The Anti-Extension Dead Bug.
For the RKC Plank (Russian Kettlebell Club Plank): assume a standard forearm plank on your yoga mat, but make three aggressive postural adjustments. First, step your feet slightly wider and squeeze your quads to lock your knees straight. Second, squeeze your glutes with maximum force and pull your hip bones upward to force a strong Posterior Pelvic Tilt. Third, pull your elbows backward against the carpet toward your toes while pulling your toes forward toward your elbows (without letting them actually slide on the mat). Hold this full-body isometric tension motionless for 30 agonizing seconds — it generates five times more abdominal stiffness than a normal plank. Follow immediately with 4 sets of 10 alternating diagonal Dead Bug lowering repetitions, focusing entirely on keeping your lower lumbar spine glued flat to the carpet without arching.

The RKC Plank Posterior-Tilt Elbow-Toe Pull
To fully execute The RKC Plank Posterior-Tilt Elbow-Toe Pull effectively, you must maintain uncompromised technical discipline and understand the underlying orthopedic mechanism. Pulling elbows and toes toward each other while in posterior tilt to generate five times more abdominal stiffness than normal planks. When executed consistently over a 60-to-90-day training cycle, this specific protocol forces profound spinal adaptation, strengthening the deep multifidus and erector spinae fibers, improving intervertebral disc hydration, and enhancing neuromuscular core co-activation across the lumbar spine.
Furthermore, integrating The RKC Plank Posterior-Tilt Elbow-Toe Pull into your daily routine provides a direct protective shield against modern office-chair posture and chronic lower back fatigue. By focusing on progressive isometric endurance, strict spinal neutrality, and controlled hinging mechanics during lumbar lordosis correction, you eliminate common spinal bottlenecks and accelerate your body natural healing capacity. Ensure that every repetition or static hold is performed with abdominal bracing and full muscular control to capture 100% of the biomechanical benefits.
Dead Bug Lumbar Carpet Glue Enforcement
To fully execute Dead Bug Lumbar Carpet Glue Enforcement effectively, you must maintain uncompromised technical discipline and understand the underlying orthopedic mechanism. Lowering opposite arm and leg while lying on your back while forcing your six-pack abs to keep your lower back glued to the carpet. When executed consistently over a 60-to-90-day training cycle, this specific protocol forces profound spinal adaptation, strengthening the deep multifidus and erector spinae fibers, improving intervertebral disc hydration, and enhancing neuromuscular core co-activation across the lumbar spine.
Furthermore, integrating Dead Bug Lumbar Carpet Glue Enforcement into your daily routine provides a direct protective shield against modern office-chair posture and chronic lower back fatigue. By focusing on progressive isometric endurance, strict spinal neutrality, and controlled hinging mechanics during lumbar lordosis correction, you eliminate common spinal bottlenecks and accelerate your body natural healing capacity. Ensure that every repetition or static hold is performed with abdominal bracing and full muscular control to capture 100% of the biomechanical benefits.
Neuromuscular Pelvic Lock Re-Programming
To fully execute Neuromuscular Pelvic Lock Re-Programming effectively, you must maintain uncompromised technical discipline and understand the underlying orthopedic mechanism. Re-training your front six-pack muscles to pull up on the front of your pelvic bone permanently throughout your daily life. When executed consistently over a 60-to-90-day training cycle, this specific protocol forces profound spinal adaptation, strengthening the deep multifidus and erector spinae fibers, improving intervertebral disc hydration, and enhancing neuromuscular core co-activation across the lumbar spine.
Furthermore, integrating Neuromuscular Pelvic Lock Re-Programming into your daily routine provides a direct protective shield against modern office-chair posture and chronic lower back fatigue. By focusing on progressive isometric endurance, strict spinal neutrality, and controlled hinging mechanics during lumbar lordosis correction, you eliminate common spinal bottlenecks and accelerate your body natural healing capacity. Ensure that every repetition or static hold is performed with abdominal bracing and full muscular control to capture 100% of the biomechanical benefits.
The Complete 25-Minute Daily Lumbar Lordosis Correction Routine
To permanently eliminate anterior pelvic tilt, flatten your protruding potbelly, and relieve chronic standing lower back fatigue right at home, execute this complete 25-minute correction routine every single day (or at least 4 days per week). You will need your yoga mat and your couch.
Master Routine Flow: Phase 1 (Unlocking the Anterior Hip): Step 1: The King Couch Psoas Stretch — 2 rounds of 90-second static holds per side (rest 15s between sides); Step 2: Posterior-Tilt 90/90 Kneeling Lunges — 2 rounds of 60 seconds per leg (rest 15s); Phase 2 (Awakening the Posterior Glute Anchor): Step 3: Strict Posterior Pelvic Tilt Glute Bridges (zero air gap) — 4 sets of 15 reps holding 3-second top PPT squeeze (rest 60s); Phase 3 (Strengthening the Anterior Abdominal Anchor): Step 4: Strict RKC Planks with elbow-toe pull — 4 rounds of 30-second maximum tension holds (rest 60s); Step 5: Anti-Extension Dead Bugs — 3 sets of 10 alternating diagonal reps gluing lumbar to carpet (rest 60s). Notice your side-profile reflection in the mirror immediately — your posture will stand visibly taller and flatter.

Chronological Stretching-to-Glutes-to-Abs Flow
To fully execute Chronological Stretching-to-Glutes-to-Abs Flow effectively, you must maintain uncompromised technical discipline and understand the underlying orthopedic mechanism. Unlocking tight psoas hip flexors first, igniting dormant glute anchors second, and building abdominal anterior pull last. When executed consistently over a 60-to-90-day training cycle, this specific protocol forces profound spinal adaptation, strengthening the deep multifidus and erector spinae fibers, improving intervertebral disc hydration, and enhancing neuromuscular core co-activation across the lumbar spine.
Furthermore, integrating Chronological Stretching-to-Glutes-to-Abs Flow into your daily routine provides a direct protective shield against modern office-chair posture and chronic lower back fatigue. By focusing on progressive isometric endurance, strict spinal neutrality, and controlled hinging mechanics during lumbar lordosis correction, you eliminate common spinal bottlenecks and accelerate your body natural healing capacity. Ensure that every repetition or static hold is performed with abdominal bracing and full muscular control to capture 100% of the biomechanical benefits.
Strict Diaphragmatic Breathing Under Posterior Tilt
To fully execute Strict Diaphragmatic Breathing Under Posterior Tilt effectively, you must maintain uncompromised technical discipline and understand the underlying orthopedic mechanism. Practicing continuous belly breathing through pursed lips while holding RKC planks and glute bridges so you never hold your breath. When executed consistently over a 60-to-90-day training cycle, this specific protocol forces profound spinal adaptation, strengthening the deep multifidus and erector spinae fibers, improving intervertebral disc hydration, and enhancing neuromuscular core co-activation across the lumbar spine.
Furthermore, integrating Strict Diaphragmatic Breathing Under Posterior Tilt into your daily routine provides a direct protective shield against modern office-chair posture and chronic lower back fatigue. By focusing on progressive isometric endurance, strict spinal neutrality, and controlled hinging mechanics during lumbar lordosis correction, you eliminate common spinal bottlenecks and accelerate your body natural healing capacity. Ensure that every repetition or static hold is performed with abdominal bracing and full muscular control to capture 100% of the biomechanical benefits.
The 30-Day Standing Posture Transformation Check
To fully execute The 30-Day Standing Posture Transformation Check effectively, you must maintain uncompromised technical discipline and understand the underlying orthopedic mechanism. Why home athletes who strictly execute this 25-minute routine experience a permanent leveling of their pelvis within 30 days. When executed consistently over a 60-to-90-day training cycle, this specific protocol forces profound spinal adaptation, strengthening the deep multifidus and erector spinae fibers, improving intervertebral disc hydration, and enhancing neuromuscular core co-activation across the lumbar spine.
Furthermore, integrating The 30-Day Standing Posture Transformation Check into your daily routine provides a direct protective shield against modern office-chair posture and chronic lower back fatigue. By focusing on progressive isometric endurance, strict spinal neutrality, and controlled hinging mechanics during lumbar lordosis correction, you eliminate common spinal bottlenecks and accelerate your body natural healing capacity. Ensure that every repetition or static hold is performed with abdominal bracing and full muscular control to capture 100% of the biomechanical benefits.
Indian Anti-Inflammatory & Collagen Nutrition for Lumbar Re-Alignment
As your pelvis shifts out of anterior tilt back into a neutral, level alignment, your compressed lower lumbar facet joints open up and your chronically stretched anterior spinal ligaments undergo structural remodeling. If your daily protein and mineral intake falls short, your body will be unable to repair these deep joint tissues and your posture will easily relapse into anterior tilt.
Consume a daily morning cup of Haldi Doodh (warm whole milk whisked with 1 teaspoon organic turmeric, ginger powder, and black pepper); curcuminoids combined with piperine naturally suppress COX-2 inflammatory enzymes inside irritated facet joints by up to 50 percent. Within 45 minutes of finishing your correction routine, consume a large recovery shake: 300ml whole milk blended with 1.5 scoops of whey protein, 2 bananas, and 1 tablespoon of peanut butter (delivering 45g complete protein). For dinner, consume 300g of organic homemade paneer or chicken breast paired with 3 cups of white rice, yellow dal, and fresh green spinach (palak) containing natural magnesium and zinc to accelerate overnight spinal ligament and cartilage repair.

Turmeric, Ginger & Black Pepper Curcumin Matrix
To fully execute Turmeric, Ginger & Black Pepper Curcumin Matrix effectively, you must maintain uncompromised technical discipline and understand the underlying orthopedic mechanism. Leveraging traditional Indian Haldi Doodh to naturally suppress COX-2 inflammatory enzymes inside jammed lumbar facet joints. When executed consistently over a 60-to-90-day training cycle, this specific protocol forces profound spinal adaptation, strengthening the deep multifidus and erector spinae fibers, improving intervertebral disc hydration, and enhancing neuromuscular core co-activation across the lumbar spine.
Furthermore, integrating Turmeric, Ginger & Black Pepper Curcumin Matrix into your daily routine provides a direct protective shield against modern office-chair posture and chronic lower back fatigue. By focusing on progressive isometric endurance, strict spinal neutrality, and controlled hinging mechanics during lumbar lordosis correction, you eliminate common spinal bottlenecks and accelerate your body natural healing capacity. Ensure that every repetition or static hold is performed with abdominal bracing and full muscular control to capture 100% of the biomechanical benefits.
The 45-Minute Post-Workout Whey & Banana Shake
To fully execute The 45-Minute Post-Workout Whey & Banana Shake effectively, you must maintain uncompromised technical discipline and understand the underlying orthopedic mechanism. Shuttling fast-absorbing whey protein and simple sugars into damaged glute and abdominal fibers within the peak anabolic window. When executed consistently over a 60-to-90-day training cycle, this specific protocol forces profound spinal adaptation, strengthening the deep multifidus and erector spinae fibers, improving intervertebral disc hydration, and enhancing neuromuscular core co-activation across the lumbar spine.
Furthermore, integrating The 45-Minute Post-Workout Whey & Banana Shake into your daily routine provides a direct protective shield against modern office-chair posture and chronic lower back fatigue. By focusing on progressive isometric endurance, strict spinal neutrality, and controlled hinging mechanics during lumbar lordosis correction, you eliminate common spinal bottlenecks and accelerate your body natural healing capacity. Ensure that every repetition or static hold is performed with abdominal bracing and full muscular control to capture 100% of the biomechanical benefits.
Zinc & Magnesium-Rich Spinach Overnight Ligament Repair
To fully execute Zinc & Magnesium-Rich Spinach Overnight Ligament Repair effectively, you must maintain uncompromised technical discipline and understand the underlying orthopedic mechanism. Utilizing natural Indian mineral sources to accelerate overnight synthesis of Type I collagen bundles inside spinal ligaments. When executed consistently over a 60-to-90-day training cycle, this specific protocol forces profound spinal adaptation, strengthening the deep multifidus and erector spinae fibers, improving intervertebral disc hydration, and enhancing neuromuscular core co-activation across the lumbar spine.
Furthermore, integrating Zinc & Magnesium-Rich Spinach Overnight Ligament Repair into your daily routine provides a direct protective shield against modern office-chair posture and chronic lower back fatigue. By focusing on progressive isometric endurance, strict spinal neutrality, and controlled hinging mechanics during lumbar lordosis correction, you eliminate common spinal bottlenecks and accelerate your body natural healing capacity. Ensure that every repetition or static hold is performed with abdominal bracing and full muscular control to capture 100% of the biomechanical benefits.

Posture Correction For – Frequently Asked Questions (FAQs) About Lumbar Lordosis Correction
How can I tell if my lower back curve is normal or exaggerated into hyper-lumbar lordosis?
Stand with your back and heels flat against a bare bedroom wall. Slide your hand behind your lower lumbar spine. In normal posture, only your fingers should snugly slide into the gap. If your entire fist or forearm easily slides between your lower back and the wall, you have Hyper-Lumbar Lordosis and Anterior Pelvic Tilt. By strictly following the spinal biomechanics and nutritional guidelines detailed in this guide on lumbar lordosis correction, you can safely achieve rapid, noticeable improvements in lower back strength while protecting your long-term spinal health.
Why does my stomach stick out like a potbelly even though I am skinny and have low body fat?
A protruding potbelly in a lean individual is the classic hallmark of Anterior Pelvic Tilt. When your pelvis tips forward and your lower back arches into hyper-lordosis, your internal abdominal organs and intestines are physically pushed forward out the front of your abdomen! Fixing your pelvic tilt flattens your stomach instantly. By strictly following the spinal biomechanics and nutritional guidelines detailed in this guide on lumbar lordosis correction, you can safely achieve rapid, noticeable improvements in lower back strength while protecting your long-term spinal health.
Can sleeping on my stomach make my lumbar lordosis and lower back pain worse?
Yes, absolutely. Sleeping on your stomach forces your lower spine into prolonged 8-hour hyperextension, compressing your lumbar facet joints. Sleep either on your back with a thick pillow placed directly underneath your knees, or sleep on your side with a pillow clamped between your thighs to keep your spine neutral. By strictly following the spinal biomechanics and nutritional guidelines detailed in this guide on lumbar lordosis correction, you can safely achieve rapid, noticeable improvements in lower back strength while protecting your long-term spinal health.
Why is the Couch Psoas Stretch so painful in my front hip crease when I first attempt it?
Extreme tightness and discomfort during the Couch Psoas Stretch indicates that your iliopsoas collagen fibers are severely shortened from years of sitting. Start by moving your knee 6 inches further away from the couch and leaning forward slightly; as your flexibility improves over 14 days, slide your knee flat to the cushion. By strictly following the spinal biomechanics and nutritional guidelines detailed in this guide on lumbar lordosis correction, you can safely achieve rapid, noticeable improvements in lower back strength while protecting your long-term spinal health.
How long does it take to permanently fix anterior pelvic tilt and stand with a flat lower back?
If you execute our 25-minute correction routine daily, stand up from your office chair every 45 minutes, and practice consciously tucking your pelvis backward into posterior tilt while walking, most home athletes permanently correct anterior pelvic tilt within 30 to 60 days. By strictly following the spinal biomechanics and nutritional guidelines detailed in this guide on lumbar lordosis correction, you can safely achieve rapid, noticeable improvements in lower back strength while protecting your long-term spinal health.